Introduction
Balboa Park's central portal, http://www.balboapark.org, attracts more than 100,000 visitors each month. The event calendar is the third most visited page of the Web site, after the homepage and list of museums. It's also one of the most time-intensive because of the dozens of cultural institutions that submit information to Balboa Park Central about their exhibitions, films, performances, lectures, and other special events. On any given day, there are more than fifty events that need to appear on the Balboa Park calendar. The Balboa Park Online Collaborative (BPOC), a project serving twenty cultural institutions in the park, initiated a project to develop an advanced calendar on Drupal, an open source platform, to simplify and streamline the process of inputting calendar events. To create this calendar, BPOC worked with Palantir, a Chicago-based Web development firm with extensive experience in Drupal development.
This mini-workshop will review the advantages of the new Drupal-based cultural calendar that BPOC and Palantir developed. Following step-by-step, workshop participants will learn how to install the calendar backend on a standalone Web site, how to construct basic calendar views, and how to install the calendar in a multi-institutional environment. will also go over the basic concepts related to sharing content between Drupal Web sites.
Calendar solutions
In a multi-institutional environment like Balboa Park, there is significant need for a centralized, automated calendar system that streamlines workflows for marketing and publicity staff by simplifying the data entry process and allowing the institutions to both coordinate events with their neighbors and distribute accurate event information to the central online portal, the Balboa Park iPhone application, media outlets, and social networks en masse.
Repeating events
Most calendar systems have the option of creating repeating events. Drupal's event and date modules have had this capability for years. The challenge that BPOC encountered was that many museums and performing arts organizations had events that were much more complicated than "every third Wednesday of the month." For example, one museum may have a film that shows every Tuesday and Thursday at 2pm and 4pm except two Fridays out of the month when it shows at 8pm, and every third Wednesday at 3pm when there is a special discounted show for seniors. Date and time logic becomes even more complex once time zones, date-without-time events, and repeating events are added to the mix. It's a complicated enough issue that the Drupal date module has not solved it in the two and a half years since an issue was first posted about it.
To solve this issue, Palantir used the iCal module to generate the appropriate instance nodes along with it, each with a single-value date field representing that specific instance, all of them referring back to the event node. Those nodes can be shown in calendar views, edited individually, rated, signed up for, or commented on – just like other nodes created with Drupal. The calendar that Palantir created provides a single place for editing complex repeating event rules with a separate node for each instance.
Pushing content between sites
BPOC and Palantir then looked at a second issue: moving content between Web sites. Although each museum within Balboa Park is able to create its own events independently, the main Balboa Park site needs to offer visitors a comprehensive look at all events happening in the park during their stay. The site also provides a central repository to then re-syndicate that information out to newspapers, tour groups, mobile applications (namely, the Balboa Park iPhone app), or anything else to which one can connect a Drupal site.
Drupal already had the ability to move content between sites using feeds, but there were a number of questions to address. Can you have a feed for potentially hundreds of events? How long would the feed need to be? What happens if an event that is no longer on the feed changes because there are so many events?
The new cultural calendar incorporates several Drupal modules that enable the pushing of complete event nodes in bulk between Drupal sites in a non-Drupal-specific manner on an inconsistent schedule. It also has built-in support for syndicating attached files with duplicate detection so that the same file isn't syndicated multiple times. The simple syndication of this content will lessen some of the laborious work of posting text and photos to multiple calendars, as well as allow for event changes to be updated across several calendars at once.
Calendar Installation
Cognizant that these calendar event issues are not unique to Balboa Park, BPOC's goal was to develop a cultural calendar that could be shared and adapted in other multi-institutional environments, including state or regional arts assocations, library systems, and university settings. Following the step-by-step instructions, anyone with basic knowledge of Drupal or similar content management systems will be able to install the calendar. The workshop will walk through downloading the necessary modules from the Web site http://www.drupal.org as well as show how to install the modules created for the project and use features to create an out-of-the-box working configuration for a collaborative calendar.
Preparation
- Create a new, empty Drupal Web site, named BPOC. This will represent the test Balboa Park central server, and will have a URL of http://bpoc.example.com/.
- Create a new, empty Drupal Web site, named Taco. This will represent the Web site for the Taco Museum, and will have a URL of http://taco.example.com/.
Announcements, step 1: BPOC
- Install the following modules from Drupal.org:
- Views
- CCK
- Features
- Rules
- push_hub
- drupal_queue
- Install the following custom-provided modules:
- Views Atom
- Install the following custom-provided features:
- balboa_announcement
- balboa_announcement_hub
- Enable the Features module.
- Enable the balboa_announcement_hub feature via the Features admin. They should enable any dependent features and modules as needed.
- Note: There is a known bug in Rule 1.2 that will show an error on the Features admin about a missing parameter. That warning is caused by a small recent change in the Features API. It has no adverse side effects on functionality, and has already been fixed in the next version of Rules. For the time being, it can be safely ignored. See: http://drupal.org/node/814416
- Complete the installation of drupal_queue. This requires running the following command from the webroot of the BPOC install:
- $ cp sites/all/modules/drupal_queue/drupal_queue_cron.php .
- And then setup a cron process on the server to hit http://bpoc.example.com/drupal_queue_cron.php periodically. (Every hour or less is recommended in this case.)
Announcements, step 2: Taco
- Install the following modules from Drupal.org:
- CCK
- Features
- Feeds
- CTools
- Strongarm
- Install the following custom-provided modules:
- Feeds Atom
- Install the following custom provided features:
- balboa_announcement
- balboa_announcement_subscriber
- Enable the balboa_announcement_subscriber features via the Features admin. They should enable any dependent features and modules as needed.
- Create a new node of type "Announcement Feed". For the Feed URL, enter http://bpoc.example.com/announcement-feed
Announcements step 3: test it
- Create a node of type Announcement on the BPOC site.
- Run the Drupal queue module. Normally this will happen periodically on its own via the cron configuration above. It may be forced for testing purposes either by visiting http://bpoc.example.com/drupal_queue_cron.php manually in a browser or running the "drush queue-cron" command (assuming Drush is installed).
- Go to admin/content/node on the Taco site. If everything is configured properly, there should be a new Announcement node there, with identical content to the one on the BPOC site.
- To add additional museums to the network, follow the Taco instructions above (Step 2) for each additional museum site.
Events, step 1: BPOC
For event handling, the individual museums are the "Hubs", and the BPOC site subscribes to all of them.
- Install the following modules from Drupal.org:
- CCK
- Features
- Feeds
- CTools
- Filefield
- Imagefield
- Date
- Install the following custom-provided modules:
- Feeds Atom
- iCal
- remote_allowed_values
- Install the following custom provided features:
- balboa_event_subscriber
- Enable the balboa_event_subscriber features via the Features admin. That should enable any dependent features and modules as needed.
- Go to admin/content/taxonomy and add a new Vocabulary. We will name it Event category. Do not enable it for any content types. Check the checkbox On under "Remote allowed values", and click Save.
- Add desired terms to the Event category vocabulary. These may be any value. Hierarchy, if specified, will be ignored.
- Add a new Vocabulary called "Event keywords". Enable it for Event instance nodes. Check the "Tags" checkbox and click Save.
Events, step 2: taco
- Install the following modules from Drupal.org:
- Views
- CCK
- Features
- Rules
- push_hub
- drupal_queue
- Filefield
- Imagefield
- Date
- Autoload
- Libraries
- UUID
- Modal Frame
- jQuery update (version 6.x-2.0)
- jQuery UI (version 6.x-1.x with jQuery UI 1.7)
- Install the following custom-provided modules:
- Views Atom
- iCal
- remote_allowed_values
- inheritedformatter
- Modalframe Exclude Node
- Automodal (use this version as opposed to the version on drupal.org)
- Install the following custom-provided feature:
- balboa_event_hub
- Install the provided iCalCreator library, version 2.6, in sites/all/libraries. The library is available for download at: http://www.kigkonsult.se/downloads/index.php
- Install the provided timepicker library in sites/all/libraries. The library is available for download at: http://milesich.com/timepicker
- Complete the installation of drupal_queue. This requires running the following command from the webroot of the Taco install:
- $ cp sites/all/modules/drupal_queue/drupal_queue_cron.php .
- And then setup a cron process on the server to hit http://taco.example.com/drupal_queue_cron.php periodically. (Every hour or less is recommended in this case.)
- Enable the Features module.
- Enable the balboa_event_hub feature via the Features admin. That should enable any dependent features and modules as needed.
- Go to admin/content/node-type/event/fields and edit the "Event category" field. Change the "Remote allowed values source URL" to read http://bpoc.example.com/api/vocabulary-terms/1. Replace "1" with the vid of the "Event category" vocabulary on the BPOC Web site, created above. (If it's an empty site it will be 1; if there were other Vocabularies already, it will be different.) Once the BPOC site has been set-up for real, the feature can be updated to prepopulate the correct vocabulary.
- Add a new Vocabulary called "Event keywords". Enable it for Event instance nodes. Check the "Tags" checkbox and click Save. (Note: The name of this vocabulary *must* match the exact name used on the BPOC site.)
- Go to the admin screen for the instance (admin/content/node-type/instance) and, under the heading Exclude Fields From ModalFrame, choose the node form fields to exclude in the pop-up on the Ajaxy widget. Save the form.
- Go to the admin screen for automodal (admin/settings/automodal) and choose "Close form windows on submit."
Events, step 3: set-up subscription
- On the BPOC Web site, create a new Institution node. Name it "Taco Museum". For the Feed URL, enter http://taco.example.com/event-feed
- On the BPOC Web site, create a new Institution node. Name it "Taco Museum – Deletion". For the Feed URL, enter http://taco.example.com/event-deletion
Events, step 4: test it
- Create a new Event node on the Taco site. Populate it as desired. Save it.
- Go to the admin/content/node page. There should now be the new Event node we just created as well as one or more Event instance nodes. View one of the instance nodes. It should display the same information that was entered on the Event, including images.
- Run the Drupal queue module. Normally this will happen periodically on its own via the cron configuration above. It may be forced for testing purposes either by visiting http://taco.example.com/drupal_queue_cron.php manually in a browser or running the "drush queue-cron" command (assuming Drush is installed).
- Go to admin/content/node on the BPOC site. If everything is configured properly, there should be one or more Event instance nodes there. Most fields should be identical to those entered on the event node on the Taco site, save for the addition of an Institution node reference that points to the Taco Museum Institution node.
- To add additional museums to the network, follow Steps 2 and 3 for each additional museum site.
Using the ajax widget
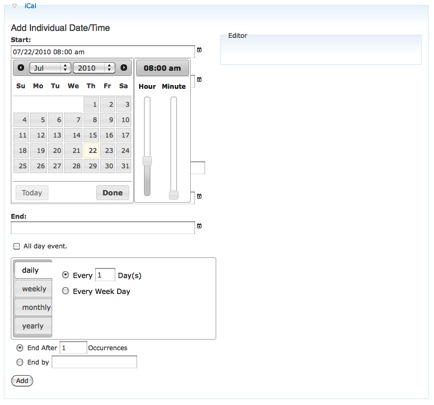
The Ajax widget provides the interface to build out complex repeating rules.
Layout
The editor is broken into three main visual areas. The top left is where individual dates can be added and updated. The lower left is where complex rules can be edited and updated. And the right column is where existing dates and rules can be edited.
Individual dates
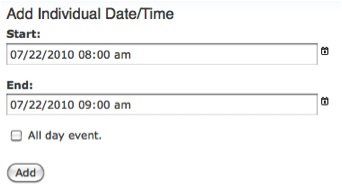
To add an individual date, begin by clicking in the start field and entering a start date and time. When you click in the field, a pop-up will appear, providing a visual way to enter the information. The pop-up has a specific format it generates for the date and time, but the form field can accept any valid date and time string within PHP.
When a start date is entered and end date is filled in defaulting to an hour after the start. This provides an intelligent default for the end.
Once the date is entered, click add to add this date to the list of dates and rules. Note: Any dates chosen are not saved until the node is saved.
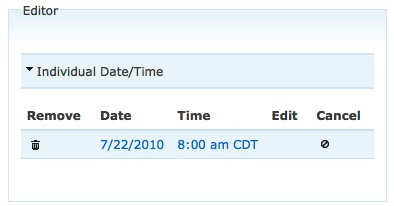
Once add is clicked, the individual date will show up on a table in the editor. At this point, the following options are available:
- Remove: will remove this date and it will disappear from the table.
- The date: clicking the date will bring it up in the in the space where it was originally added for the date to be edited.
- Cancel: This will set the status for this individual date to be cancelled.
At this point, you'll notice the edit link is not available. The edit link is available where instances have been generated. Since this has not yet been saved, no instances are available.
If the node is saved and you go edit it again, you will see that the edit link is available. This is because the instance node has been created.
Clicking the Edit link here will bring up a modal window with the node form for the instance so you can edit the instance
The form fields available on this form are configurable with the ModalFrame Exclude Node module (configuring detail elsewhere in documentation).
Rules
Rules have a more complex form to gather all the information needed to generate rules.
In addition to the start and end fields from the single date form, a name, repeating pattern, and end are required. When they are filled in, click add.
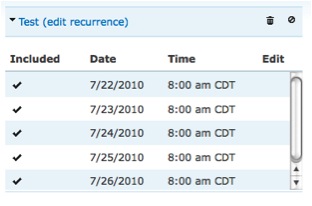
When a rule is added, there are two sections to the rule. The top contains the name and actions you can do on the rule. Below that is a table of individual dates.
The actions against the rule are:
- Updating: clicking the title lets you update the rule.
- Removing: clicking remove will remove the rule and its instances from the editor and, on node save, will remove all the instances from Drupal.
- Cancel: clicking cancel will set the cancel state for the rule and its instances. The instances will be updated when the node is saved.
Note: All of the actions described here are updated in the browser and will take effect when the node is saved.
Instances have two actions for each of them. An instance can be excluded by clicking the Included link to the left of the instance date.
This will gray out the instance and cause the instance to not be generated. Or, if an instance is generated, it will be deleted.
The other action is to edit the details of the instance. To access this functionality the node will need to be saved with the rule on it first. Once the rule has been saved, edit links will appear next to the instances.
As with editing the individual dates, when you click edit, a node form pops up in a modal. When you save the changes to that instance, they are live on the instance immediately.
Configuring search
Saved searches
Saved Searches require the core Search module and Views. It will take advantage of the Apache Solr module if it is installed.
Once you enable the Saved Searches module, you will want to turn on its blocks. Two blocks provide nearly all of the Saved Searches UI:
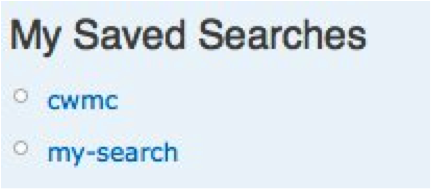
- "saved searches: save this search form" – a form that lets users save, name, rename, and delete their saved searches, depending on their permissions. This will only be visible on search results pages.
- "savedsearches_user: Block" – a list of the current user's saved searches, provided by a default View. This will not show up if a user has no searches saved.
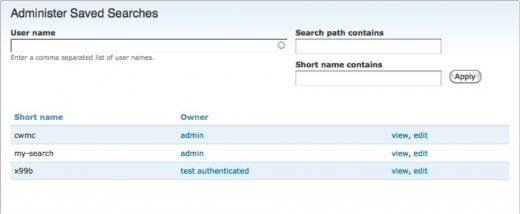
There is an administration user interface at admin/content/savedsearches where users with the 'administer saved searches' permission may edit and delete any saved search. This UI is provided by a default View.
Configure permissions
- The Saved Searches relies on the "search content" permission to determine whether users are allowed to view saved search pages.
- The create, delete, name, and re-use permissions allow different levels of control when saving searches.
- 'create' allows users to save searches. If they do not have the 'name' permission, users will see a simple 'save this search' button, and their searches will be named with short random strings.
- 'name' will allow users to use a text input box to name their searches; if they leave it blank, their searches will be named with short random strings.
- 're-use' will allow users to save a search using a name they already own, using a select menu.
- 'delete' provides users with a checkbox to delete their saved search.
- The 'create' and 're-use' forms will only show up on un-saved search results pages. The 'name' and 'delete' forms will show up on saved search results pages – whether the user arrives at the page via the short link, or via the normal search workflow
Apache solr facets
The Apache Solr module provides some facets by default, including CCK fields, node attributes, and vocabularies. Several of these default facets deal with dates, and provide a nice widget with nested date/time granularity. Facets are also referred to as 'filters', and are listed at admin/settings/apachesolr/enabled-filters.
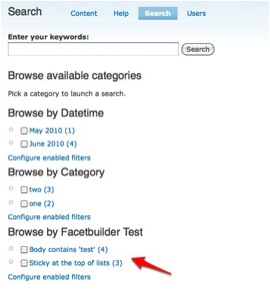
Once a filter is enabled, Apache Solr provides a block for it. This block will only be visible when there are search results on the page, and when the facet is not empty for the given search. You may configure facets to be visible on empty searches, so that users may start their search by navigating facets (rather than by entering a search keyword).
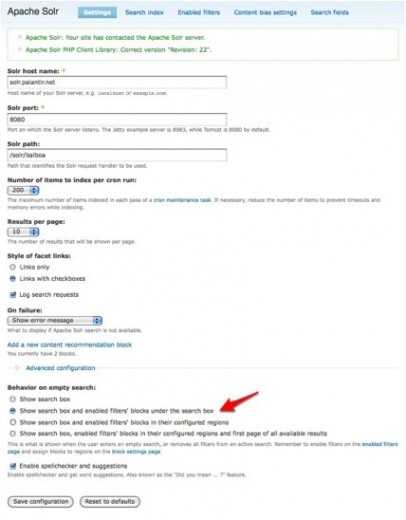 Fig 15: Apache Solr Configuration
The Apache Solr Facet Builder module lets you build custom facets using Views.
After enabling the Facet Builder module, create a new View.
- Add one or more filters to the View; you do not need to expose the filters, and you do not need to add anything to the View other than filters (no arguments, sorts, etc.)
- You may add a field to hide the standard Views error ('Display "Defaults" uses fields, but there are none defined for it, or all are excluded.'), or you can change the row style to 'node' instead of 'fields' – this doesn't affect the facet.
- Once you've added one or more filters, add a 'Facet' display
- Add a second 'facet' display, with a different set of filters.
- Give these facet displays useful names: each facet display that you add to this View will be a checkbox in the search interface.
Save the View, and then visit admin/settings/apachesolr/enabled-filters – there will be a new section at the bottom entitled "Apache Solr Facet Builder" with a checkbox for your new View. Check this box, then run cron so that the new facet gets added to the index.
 Fig 18: Apache Solr Facet Builder
If you change the facet View you've built, you will need to re-index your content.
 Fig 19: Queue Content for Rendering
If you've enabled blocks for other facets, you will want to visit admin/build/block and enable the block for your new facet as well. The block will be named like "Apache Solr Facet Builder: Filter by [view title] ([view_name]))"


